2026 Season Registration is Open
The Dayton Tri hosts the USAT Ohio State Championships!
Get Training Tips for your Off-Season
Kids Races at the Dayton Tri, and 5k, 10k & 15k Runs added to all Race Dates
Boost Your Bike: Cycling Form and Drills
Learn more about the research consulted and images used in this section.
| Cycling Resources & Tips | Bike Safety | Bike Handling | Surge Your Swim | Rock Your Run |
| Nutrition | Strength | Our Races | Training Plans | Tri Training Tips | Coaching |
Boost your bike this season with training advice from Zoom Multisport Racing. Put these to the test in the Zoom Triathlons, Duathlons, & Aquabike this summer!
General Information on Cycling and How to Ride Faster and Safer
- Global Cycling Network
- Bicycling.com: Everything you Want to Know About Cycling from Gear & Repair to Training & Racing.
- Series of Videos to Road Riding Skills
- 10 Common Cycling Mistakes
- Beginner Triathlete: Resources for Triathletes at all Levels, not just Beginners
- TriathaNewbie.com: New to Triathlon? They are Here to Help!
Form and Technique
Learn how to improve your pedal stroke and bike handling to get more power, efficiency & speed.
- Pedal Stroke Basics
- Pedaling Technique & Drills to Help
- Pedal Stroke Drills
- Helping You with Bike Handing
- Video to Help You Pedal Like a Pro
- Guides, Gear and Info on Triathlon Cycling
- Improving Your Cycling Skills
- Cycling Technique Tips
- More Great Cycling Drills to Help Your Pedal Stroke
Faster Bike Splits
- Tips for a Faster Bike Split
- Help on Getting a Faster Bike Split
- Going Faster on the Bike
- Master Your Gears
Physiology and Pedal Stroke
Video to Help You With Your Pedal Stroke
Pedal Stroke Exercises & Drills
- Indoor Spinning - Ride your bike on an indoor trainer at a comfortably high cadence in a low gear. Pay particular attention to the sound your rear wheel makes. An oscillating “whir-whir-whir” like a fan is constantly changing speed means you have a choppy, uneven stroke that exaggerates the downstroke. You may be shifting your body weight from side to side to accentuate the downward force. Concentrate on pedaling smoothly with no rocking of the upper body so that the sound of the rear wheel is a continuous “whirrrr”.
- Isolated-leg Training - On an indoor trainer, pedal with one leg only while the other foot rests on the frame or a chair. Alternate legs, doing 20-60 seconds on each side. The dead spots in your stroke phase transitions are immediately obvious when you do this exercise, as you are not allowing your legs to compensate for each other. This helps you learn how to pedal smoothly.
- More Great Cycling Drills to Help Your Pedal Stroke
Cadence
- Cadence is the speed with which you spin the pedals. Generally a higher cadence, 80-110 revolutions per minute is better (60-80 while climbing), as it allows you to ride with less stress on your legs, but everyone individual is different, so find the cadence that works for you.
- To maintain your cadence you will need to change gears. Effective gearing gives you more power over longer periods of time. Find the best gear that you can go fast in; this may not always be the biggest gear you can force around.
- It is recommended that you keep a consistent cadence by shifting gears depending on the terrain, your desired speed and effort. For example, to keep a high cadence I may need to find an easier gear when climbing or a harder gear when traveling downhill.
- You will need to get a cadence computer on your bike to track your cadence. This can be a helpful way to guide your pedal effort.
Heart rate
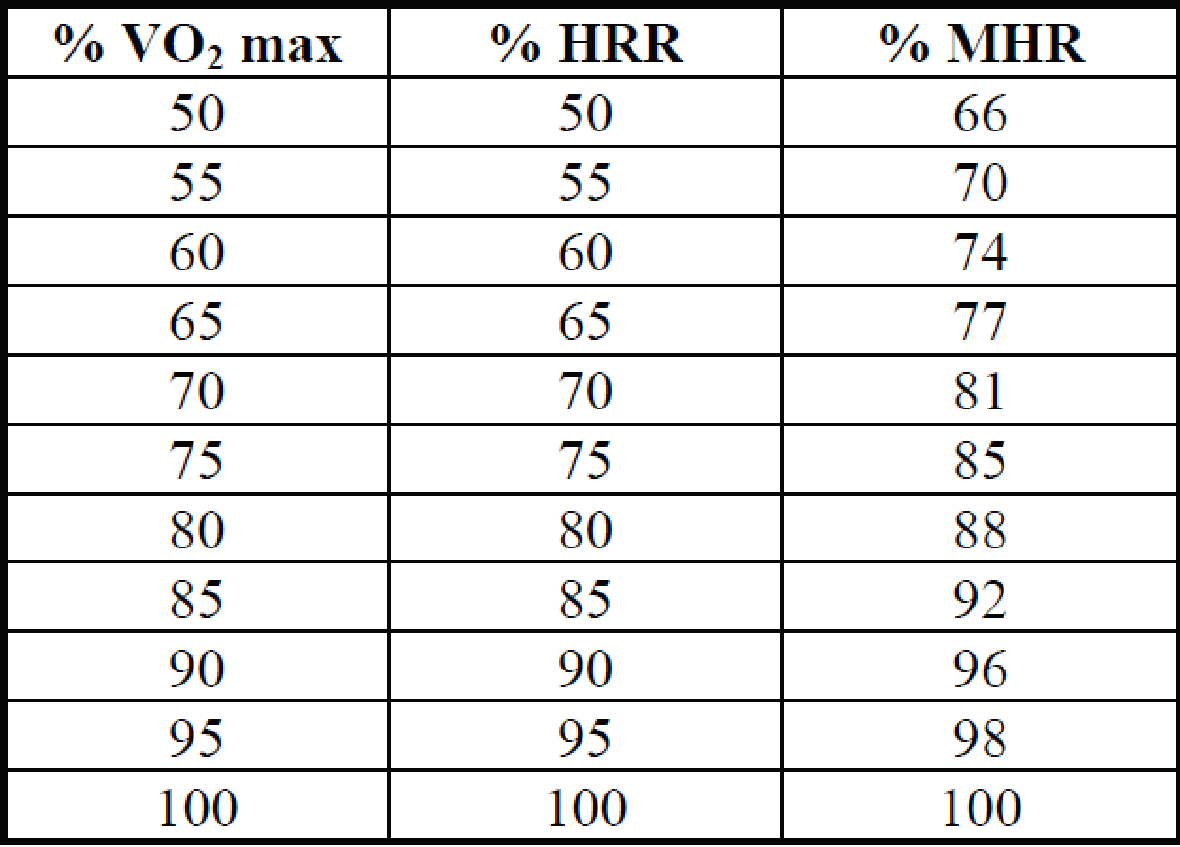
Figure out your resting heart rate and then calculate your maximum heart rate and your heart rate training zones. Max Heart Rate = 220 - age
More on Heart Rate Training for Cyclists
An Easy to Use Heart Rate Zone Calculator
Quick Guide for Setting Up Your Heart Rate Zones
Recovery Zone
This is the “active recovery” zone when you are stretching or performing other maintenance related activities like pilates, yoga or walking.This is where you will do your recovery rides. It may feel like you aren’t training at all in this zone, but here you flush out your muscles in between intense training sessions. Ensure that you don’t go too hard so you are well rested.
- <50% of maximum heart rate: For light training and rest
- Zone 1: 50-65% of maximum heart rate: For long, easy rides, to improve the combustion and storage of fats.
Aerobic Training
This is for building an aerobic base and where you will spend a lot of time when you are building your cycling base fitness. This zone builds your aerobic power and enables you to ride long distances and improves your average speed while riding at an easy pace. In this zone you are able to carry on a normal conversation and occurs at a relaxed pace. It’s also the zone where you’ll warm up and cool down in. This zone is for increasing muscle glycogen storage. On the other hand this zone is too fast to build your aerobic base but too slow to develop your V02MAX and lactate threshold. So limit your time in this zone and use it in moderation. It can be used to ease you into interval training and during a specialization period before starting to race.
- Zone 2 (65-75% of MHR): The basic base training zone. Longish rides of medium stress.
- Zone 3 (75-82% of MHR): For the development of aerobic capacity and endurance with moderate volume at a very controlled intensity.
Anaerobic Training
Here you will get real improvements to your fitness because riding in this zone helps to increase your ability to ride at lactate threshold. This is not an easy zone to train in and is associated with interval training where you’ll ride for short durations at an above average intensity. You’ll be breathing hard in this zone and not able to carry on a conversation. Training in this zone helps build a tolerance to the muscle burn that you get when riding hard as well as your strength endurance. Often referred to as “V02MAX” this is the hardest zone to train in. This is a zone where you will increase your V02MAX and build your heart’s ability to increase its cardio output. It is mainly reserved for short and very intense intervals as it is not a zone that you can spend much time in. However, trained properly, cyclists can ride a short 20 minute individual time trial almost completely at the bottom of this zone. Holding a conversation is impossible. Use the lower end of this zone for very intense interval training and the higher end for sprint training.
- Zone 4 (82-91% of MHR): For raising the anaerobic threshold. Good sessions for 10- and 25-mile time-trials.
- Zone 5 (92-100% of MHR): For high-intensity interval training to increase maximum power and speed
Perceived Effort & Speed
- These are less effective ways to measure your effort and output.
- Perceived effort is very subjective and can vary according to your body’s fitness level. If you are fatigued, you may feel like you have to work harder to maintain an effort that would be easy when you are well rested. On the other hand, if you feel tired, stressed, or generally unmotivated it might signal that you need to take it easy and allow your body to recover. Using perceived effort during a race is deceptive, because you actually need to push harder to maintain the same pace.
- Speed can be a guide on the bike, just as the pace is a guide in the run. You can use speed as a guideline to check yourself in training and racing. Try to maintain a consistently fast speed during your race. Train to see what speed you can effectively hold over a long period of time then use that as a guide in your races.
Use Multiple Measures to Check Yourself
When you are racing and training monitor your as many of these as you can. The more information you have the better. You can then have a more accurate idea of how you are doing and where you need to improve.
BytePages Content Management System Powered by Byte Productions™