2026 Season Registration is Open
The Dayton Tri hosts the USAT Ohio State Championships!
Get Training Tips for your Off-Season
Kids Races at the Dayton Tri, and 5k, 10k & 15k Runs added to all Race Dates
Tear Up Transition: Resources & Tips
Learn more about the research consulted and images used in this section.
| Surge Your Swim | Boost Your Bike | Rock Your Run | Nutrition | Strength |
| Our Races | Training Plans | Tri Training Tips | Coaching |
Tear Up Transition in Your Next Triathlon
Triathlons are multi-sport races that include multiple disciplines or sports in the same race. The most common triathlon event starts with a swim, followed by a bike, and concludes with a run. Between each discipline, the athlete must enter a "transition area" where they switch from one sport to the next. In the transition area, the athlete switches out their sport-specific gear and exchanges it for the items they need to accomplish the next leg of the race.
Racers enter the transition area two times. T1 (Transition 1) occurs between the swim and the bike. T2 (Transition 2) is between the bike the run. For example, T1 athletes drop off their goggles and swim cap and pick up their bike, shoes, helmet, sunglasses, and water bottles. In T2, for example, athletes rid themselves of their cycling gear and get on their run shoes.
Mastering the transition can save you valuable time in a triathlon race. Below are some articles and videos that will help you tear up your transitions in your next race!
Resources
The Do's and Don'ts of Transition
Taking Your Transitions to the Next Level
Transition Tips from the Experts
Video Tutorials
Setting Up Transition for Beginners
Improving Your Transition Time Part 1 & Part 2
Master the Bike to Run Transition
Prepare for the Run While on the Bike: With about five to eight minutes of the bike portion remaining, start thinking "run" and prepare for it appropriately.
- Get out of the saddle in a slightly bigger gear and ride a couple of hundred meters standing up. This will alter your muscle firing patterns to make them more akin to running; it will also stretch your running muscles and start redirecting blood to the appropriate muscles.
- Sit back down and put your bike into a smaller gear and spin your legs over, rather than cranking big gears all the way into the transition.
- Start stretching your "running muscles" (i.e., hamstrings, calves and lower back) on the bike as you head to the transition. This will help to ensure that they are looser, more supple and ready for the change of disciplines.
- Training for this transition: During the base phase of your training, incorporate at least one "brick" session into your weekly training. This involves biking then running into one workout. This will help train your legs to prepare for this transition in a race.
Hill running requires you to use your quads more than running on flat surfaces, and the lifting motion of running uphill uses your quads and glutes in a manner that is much more akin to cycling than running along the flat. This will result in a cross-training effect on your leg muscles and will benefit your cycling and running as well as your transition from one discipline to the other.
Triathlon Transition Basics - (Under Construction - more coming soon & images too...)
Ensure that you have all your equipment
- ID & USAT membership card
- Triathlon racing uniform & race number or body marking
- Towel, Wetsuit, goggles, swim cap
- Bike, helmet, sunglasses, bike shoes, nutrition & drink (sox are optional)
- Run shoes & race belt (hat is optional)
Check your equipment to ensure proper function. Basic bike check: Are my tires inflated? Are my brakes working? Can I shift smoothly?
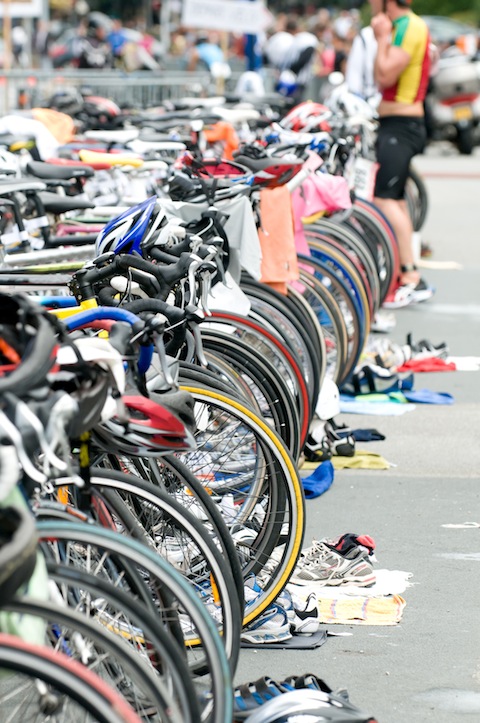
Set-up your transition area
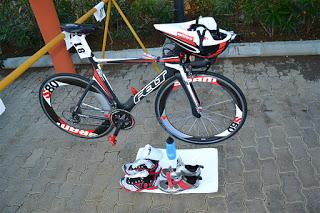
The Bike
- Place your bike on the rack by placing the seat on the bar with the bike facing toward you or toward the way in which you intend to exit the transition area
- Place your helmet on the handle bar with your sunglasses on top of the helmet
- You can also store your sunglasses on your helmet with tape and put them on while riding
- Place your shoes clipped on the pedals
- Be sure the crank arms are at the 3 o’clock (right side / derailleur side is closest to the front wheel) and 9 o’clock (left side is closest to the rear wheel) and using rubber bands to hold the shoes parallel to the pedals
- Ensure that you unvelcro or unclasp your shoes and make sure the opening is wide so you can get your foot in easily
- Tape gels on the top tube or place them in pouch
- Be sure your water bottles are filled and placed on the bike
Your Towel: I recommend placing a towel in your transition area to wipe your feet. Once you exit the water you may have to run over sand, dirt, or other substances on the way to the transition area. Having a towel allows you to quickly wipe your feet (as needed) before you mount the bike.
Run Shoes & Gear (sox, hat, nutrition/drink & racing belt) on the towel
- Sox or No Sox? Racing without sox is faster, but you need to prepare yourself to race without sex. I recommend you practice and train without sox. Also, I recommend you use an anti-chafing agent to prevent blisters. If you are going to use sox, do not sit down to put on your sox. Once you have removed your wetsuit, quickly put on your sox.
T1, Removing your wetsuit
- Before the race: Body glide on the ankles; this will help you get the suit off faster
- Before the swim: Secure Zipper strap under Velcro cover
- As you are exiting the water and running to transition: (a) Grab the zipper and unzip the wetsuit; (b) Remove your arms from the wetsuit; & (c) Push the wetsuit as far down toward your hips as you can without slowing your run
- In transition:
- Once you get to your bike, push the wetsuit down as far as you can on your legs
- Step on your wetsuit (with the opposite leg) and pull your leg out. As you step back down, step on the wetsuit and pull out your other leg
- If you get really good you can pop your legs out without having to step down in it
- Place your wetsuit in your transition area
Example Video: http://www.youtube.com/watch?v=V3h1tk7in6I
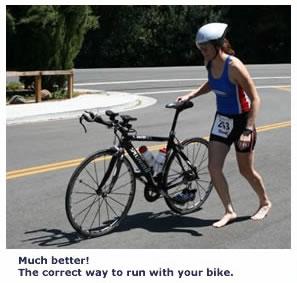
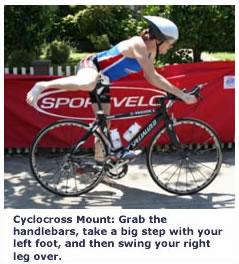
T1, Mounting the Bike / Flying Mount
Use the flying mount: Recommend trying this in the grass first: http://www.youtube.com/watch?v=RD8nieSyAOs
- Run with your bike, standing on the left side of the bike
- Grip the seat with your right hand (you can steer the bike with your seat)
- Keep your left hand free or place your left hand on the handlebars
- Cross the mount line and get clear of other riders (I recommend heading to outer edges)
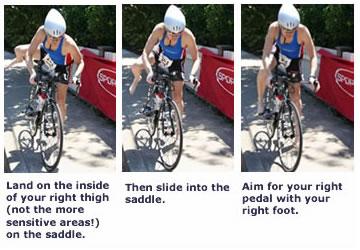
- While running, place both of your hands on the handlebars (hoods or just behind the hoods)
- Hop onto your bike, landing with your right thigh on the seat and slide onto the seat
- Put your right foot down on the pedal (on top of your shoes) and then put your left foot down on the pedal (on top of your shoes). Pedal.
EXAMPLE
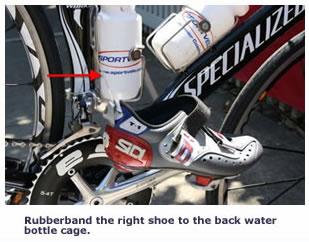
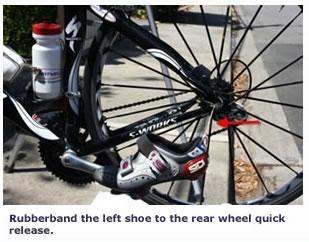
Option to Attach Your Shoes to the Bike
- Clip your shoes to the bike.
- If you do not have a loop on the back of the shoes attach a safety pin to the shoes.
- Loop a rubber band through the loop on your shoe (or safety pin) and then attach the rubber band to the bike (see images below).
Rubber Banding Your Shoes to the Bike
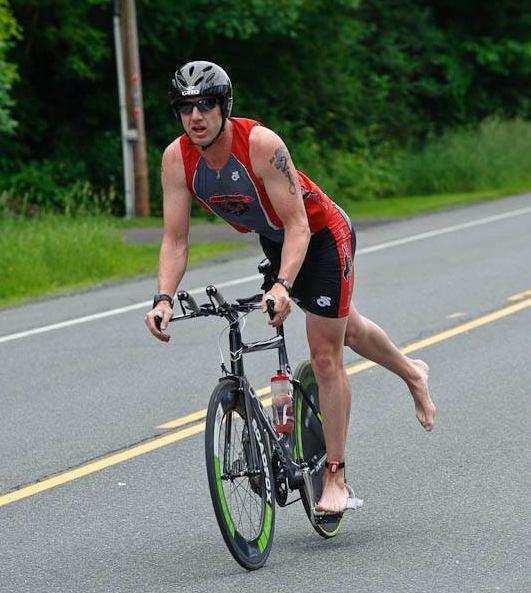
Getting my feet in my shoes
- Ride and get to a flat road or slight downhill; if this is not possible, then pedal quickly and then coast.
- Place your right foot in your shoe
- Keep your eyes on the road
- Keep your left hand on your handlebars
- Use your right hand to reach down and guide your foot in your shoe
- Velcro or secure your shoe
- Pedal to regain momentum. Coast.
- Keep your eyes on the road
- Keep your right hand on your handlebars
- Use your left hand to reach down and guide your foot in your shoe
- Velcro or secure your shoe
- Pedal and start racing!
Removing my feet from my shoes: I recommend trying this on your trainer first
- Ride and get to a flat road or slight downhill; if this is not possible, then pedal quickly and then coast
- Removing your left foot in your shoe
- Keep your eyes on the road
- Keep your right hand on your handlebars
- Use your left hand to reach down, loosen the fastening and guide your foot out of your shoe
- Pedal to regain momentum. Coast.
- Keep your eyes on the road
- Keep your left hand on your handlebars
- Use your right hand to reach down, loosen the fastening and guide your foot out of your shoe
T2, Flying Dismount
Use the flying Dismount: Recommend trying this in the grass first: http://www.youtube.com/watch?v=RD8nieSyAOs
- Keep both hands on the handlebars (hoods)
- Stand up on your bike & place your weight on your left foot
- Swing your right leg over the handlebars so that it is slightly in front of your left foot; keep your weight on your left foot
- Stand on your left foot and use your brakes to slow the bike
- Extend your right leg out
- Right before you come to a stop, step down from the bike on your right leg, by placing it on the ground
- Then put your left leg down and run with your bike into transition
T2, To The Run
- Re-rack your bike & remove your helmet
- Slip into your shoes (Zip ties allow you to not ties them). Remain standing while you do this
- Grab anything else you need and start running
- Hat, race belt, nutrition/drink
BytePages Content Management System Powered by Byte Productions™