2026 Season Registration is Open
The Dayton Tri hosts the USAT Ohio State Championships!
Get Training Tips for your Off-Season
Kids Races at the Dayton Tri, and 5k, 10k & 15k Runs added to all Race Dates
Bike Safety
Learn more about the research consulted and images used in this section.
| Resources & Tips | Form & Drills | Bike Handling | Surge Your Swim | Rock Your Run |
| Nutrition | Strength | Our Races | Training Plans | Tri Training Tips | Coaching |
Boost your bike this season with training advice from Zoom Multisport Racing. Put these to the test in the Zoom Triathlons, Duathlons, & Aquabike this summer!
Safe Riding Resources
Safe Riding and Cycling Tips
- Ride on Flattest Road Surface: Picking the fastest line usually where the car tires wear the road down can be the smoothest part of the road. Not only will you go faster but will be less bone shaking than riding on the rough part of the road surface. If the road surface is wet this may be slower due to loss of traction.
- Ride Right: While you have the right of way on the road it is still smart to ride on the right side of the lane. In a triathlon it is required that you ride as far right as you safely can, so not block other riders trying to pass. In training rides it is also smart to ride right. Even though you have the same rights as a car, cars do not understand or always obey traffic laws. You may be correct, but riding right is safer.
- Be Visible: When training in adverse conditions dress for the weather, use lights, and wear bright clothes. It is always best to ride defensively and be seen by other riders and cars. Riding in a pack or with a group is also helpful.
- Be Courteous: I always appreciate a kind word, wide berth, or helpful signal when I am with other riders. Remember we are all striving for the same goal, so do not cut people off, use rude language, or make sudden movements. Encourage others in the race or ride, signal in advance, call out your position, signal your intention, and do your best.
- Keep your Chain in the Middle of the Derailleur: Look down next time you are out riding. You should notice that you have 2-3 rings in the front and the back will have about 11 rings. When you are riding, try to keep the chain in a sort-of straight line between the front and rear sets, rather than going at an extreme angle from left to right. For example, in the very lowest gear the chain will be all the way on the left on both sets. In the very highest gear the chain will be all the way on the right. That's fine. What you don't want to do is to use the left-most ring in the front and the right-most ring in the back, making the chain go diagonally. That stretches the chain and wears it out. Likewise, don't use the right-most ring in the front and the left-most ring in the back. Additionally the extra stress on the chain the most extreme positions can offer more resistance and slow pedaling (even if just a little). It is more efficient to keep your chain in the middle.
- Signal and Communicate with others on the Road; Signal in and communicate in advance of your action so other riders can respond
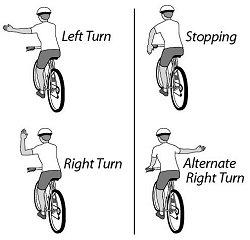
- Know the official bike hand signals: (a) Turning: Extend left/right arm straight out in the direction of the turn, horizontally; (b) Braking or Stopping: Extend your left upper arm out to the left, horizontally and angle your forearm vertically downward.
Hand Signals
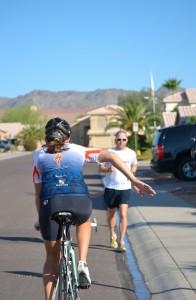
- Communicate with other riders or people on the road/path. Signal road hazards or unsafe conditions: (a) Point down on the hazard side to indicate hazard; (b) Place hand in braking position and wave to the left to indicate riders should move left to avoid a hazard
Loose Gravel
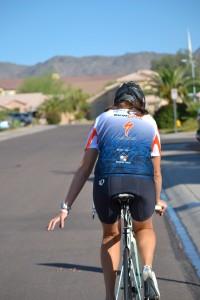
Move Over
Road Hazard
- Verbally call out the obstacle or situation in addition to your hand gesture: Hole, Rough Road, Walkers/Runners ahead, Car front, Car back, All clear or Clear (used to indicate one can proceed across a street without danger), Slowing and Stopping
- Signal passing or bike position: On your left or Passing on left
Copyright 2026 Zoom Multisport Racing
BytePages Content Management System Powered by Byte Productions™
BytePages Content Management System Powered by Byte Productions™